IDA

CELF file​

The IDA Matching Tool (MT) facilitates the identification of audiovisual works.

By automating the matching treatment of a CELF file against IDA, Users can automatically search for IDA references.

With a CELF file and the Matching Tool, Users can export their results: list of matched works, list of unmatched works.

Furthermore, Users can adjust their matching fields ponderation score, for a “sur mesure” treat.

What is a CELF file?

CELF stands for Common Enquiry List Format!

A CELF file contains the information you want to match against IDA Work references, using the Matching Tool.

A CELF file can be edited using any workbook software such as Excel or Open Office.

The CELF file – Common Enquiry List Format= CISAC Standard format for Enquiry Lists.

The CISAC format CELF is meant to standardize the exchanges of information between sister societies.

The CELF file is the 1st step for you to take, in order to use the Matching Tool.

CELF file formats

The expected format for each column is defined in the CELF standard (CISAC website).

CELF file can be of 3 types:

  • txt
  • tsv
  • or CSV

Bear in mind that if you submit a CSV or tsv format CELF file, you will get a CSV format results file.

The same way, if you submit a txt format CELF file, you will get a txt format results file.

Below is an example of what a csv CELF file looks like: a 41 columns workbook file.

Below is an example of what a txt CELF file looks like.

Each column correspond to a field that will be match against a field in IDA.

As much as you can, fill in a maximum of columns.

The columns with its number in green, are those on which a CMO, can apply a preset  ponderation in the Matching Tool (continue reading for more information: cf Preset paragraph.)

How to use and validate the CELF file?

Step 1.

Once logged into the Matching Tool, submit your file for validation by clicking the “Add a new submission” button.

A pop up window will open.

You can either submit a csv, a tsv, or a txt file.

According to the type of file submitted, adjust the “Celf file delimiter” drop down menu.

  • tabulation for csv or tsv
  • semicolon for txt 

Step 2.

In the “Submission title” area, by default, the name of your file will display.

However, you can decide to change the name your submission, for a text that is more self explanoatory.

  • By default the field takes the file name
  • users can change the name for one that is more specific

Step 3.

In the Preset drop down menu, you can select the “Preset” to apply:

  • your own personal one(s)
  • your CMO preset

(find out more about Preset in the below section).

Step 4.

You can now click, either the “Create” or the “Create and edit” button.

  • the “Create” function send your CELF file straight for validation, without allowing the Users to change their preset ponderation score
  • while the “Create and edit” button, will open a window that entitles the Users to change the preset ponderation score before submiting the file.
  • file submitted for validation using the “Create and edit” button
  • …waiting for the user to adjust his preset before complete submission
  • do not forget to save your submission to launch the validation process!

Step 5.

Once you have submitted your CELF file, you must wait for your file to be validated.  It shouldt take 1 minute or two.

Once your file has been processed, the Matching Tool will display the number of records that are Valids, and Invalids.

Step 6.

You must correct the errors found by the Matching Tool in your CELF file, before you can launch the matching process. 

For further assistance, check the below section “Common issues related to the validation of the CELF file”.

Step 7.

Once the step 6 is completed (your CELF file has no error left), the file moves from the section “Validating CELF file” to the underneath section “Ready to launch”.

You can now click the arrow button on the right hand side to start the matching process.

Step 8.

Well done, you can now navigate to the “How to validate the results on the Matching Tool?” section.

How to correct issues related to the validation of CELF file?

The Matching Tool helps you comply with the CELF format file, by providing a detailed report of encountered errors while validating: the log file.

The .log file

The log file reports:

  • the line where the problem is (in our example, the lines 105 & 270)
  • the field that is not compliant (in our example, the field “Work Type”)
  • and the value found in your submitted file, the value that caused the error, and that you need to correct (in our example, SER)
  • Exemple of error report: “- Error – Validation format –L.105 The field ‘Work Type’ is not a valid Audiovisual Work Type code : SER”

Step 1.

To retreive the log file, you should click:

  • on the “Validation errors” link on the right hand side of your file’s section
  • or on the drop down button, and select “Download Log History”

Step 2.

According to the web browser you are surfing the web with, a .log file should either:

  • download on your workstation
  • or you will be prompted to decide wether you want to open the file or save it on your workstation

Step 3.

  • Open the file and check the errors reported by the Matching Tool.

Here are the main issues encountered regarding the format :

  • Duration of usage : 5 digits where M stands for Minute, and S stands for Second : MMMSS.
  • Broadcasting Date: 8 digits where Y stands for Year, M stands for Month, D stands for Day :  YYYYMMDD
  • Broadcasting Time: 6 digits where H stands for Hour, M stands for Minute, S stands for Second: HHMMSS
  • Country (every field containing a country): 2 digits taken into the IDA nomenclature Country codes
  • Language (every field containing a language): 2 digits taken into the IDA nomenclature  Language codes

Step 4.

  • Once your file is corrected, you can save it and submit it again for validation.
  • rewind to step 1 : validate your CELF file

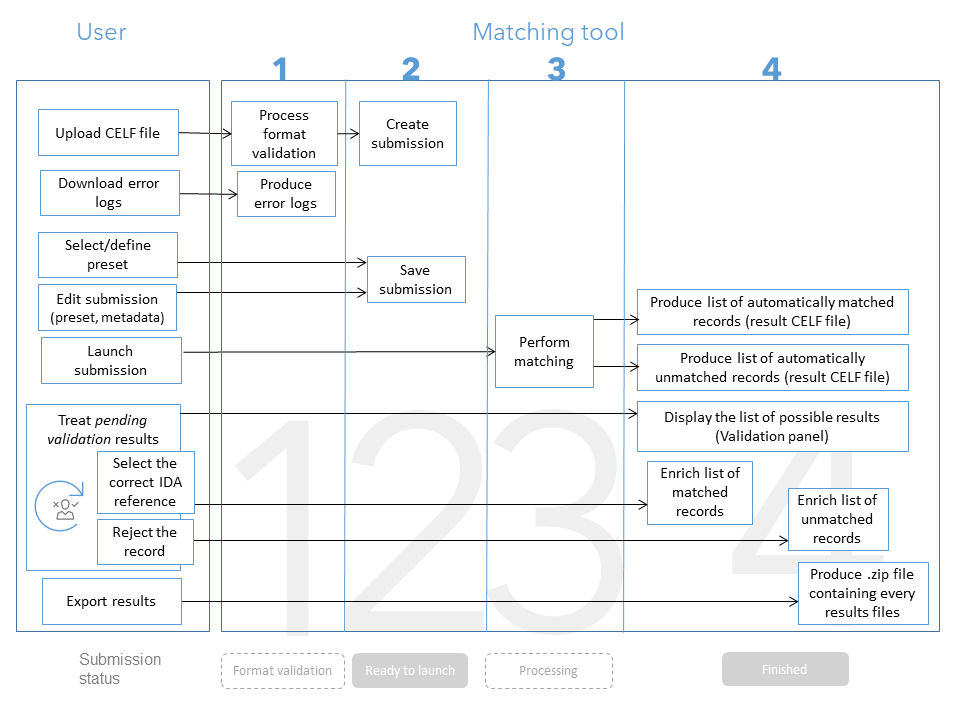
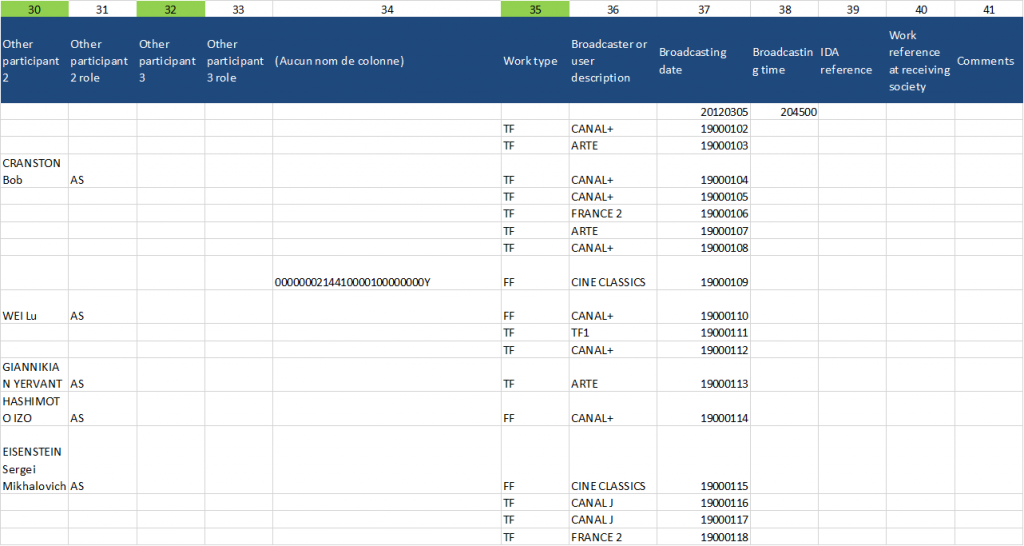
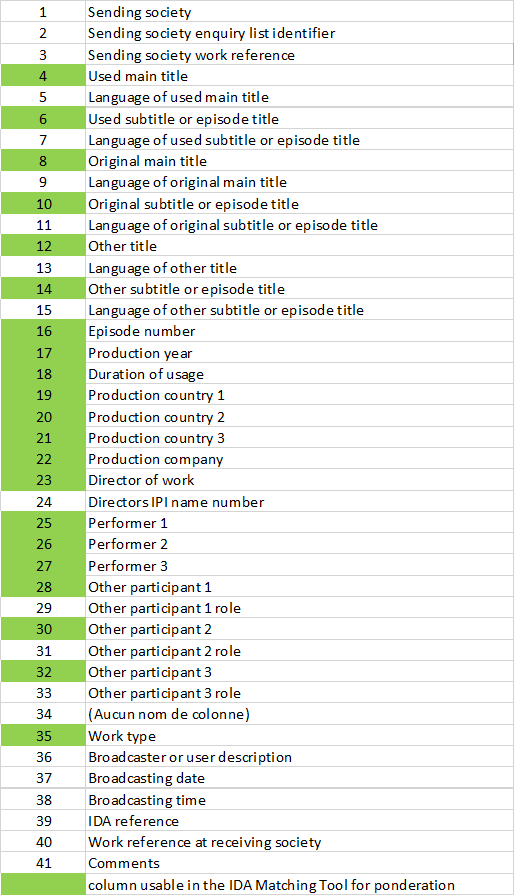
Create your CELF file

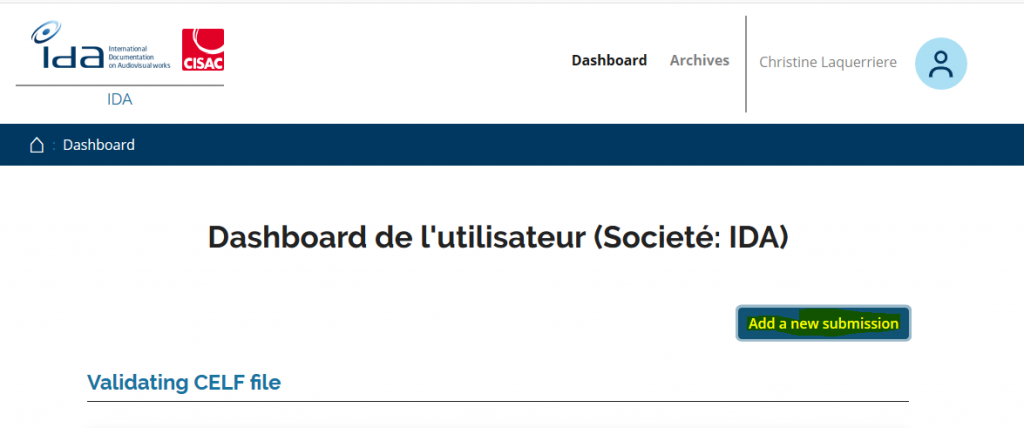
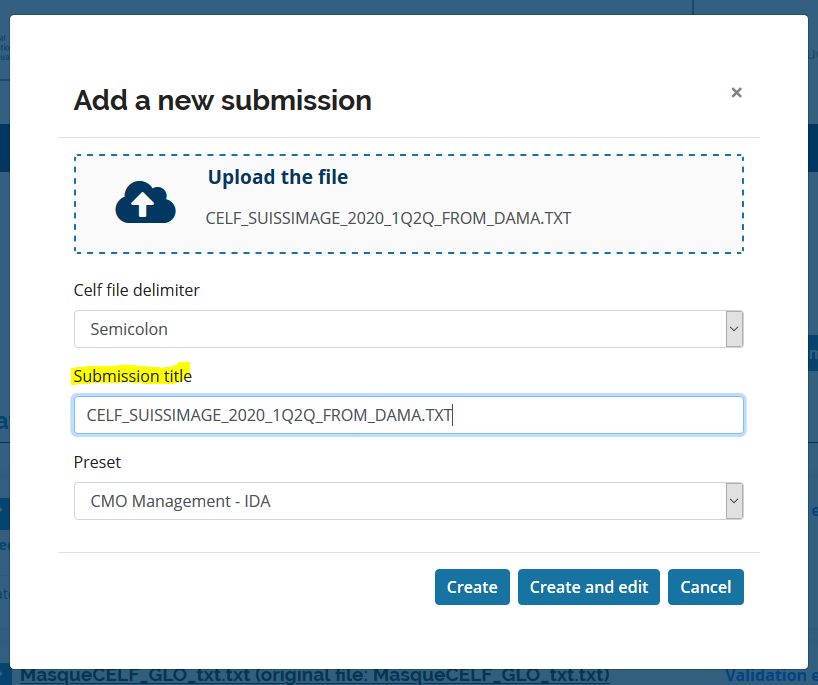
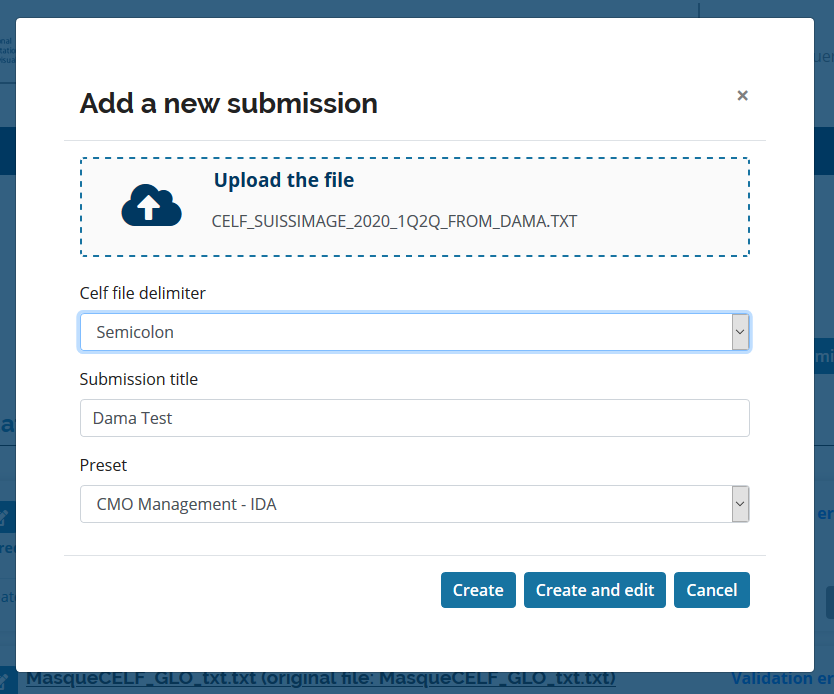
Submit your file to the Matching Tool

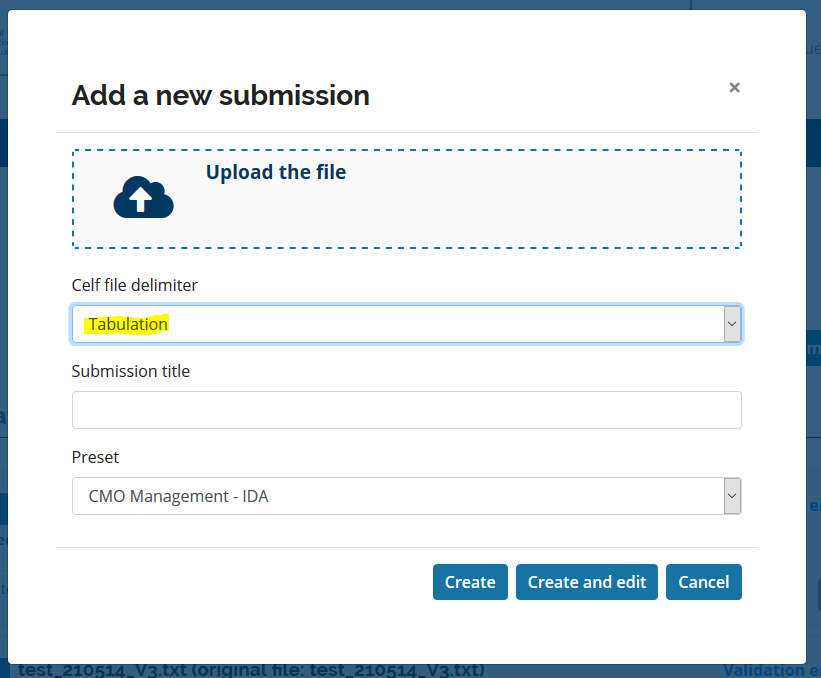
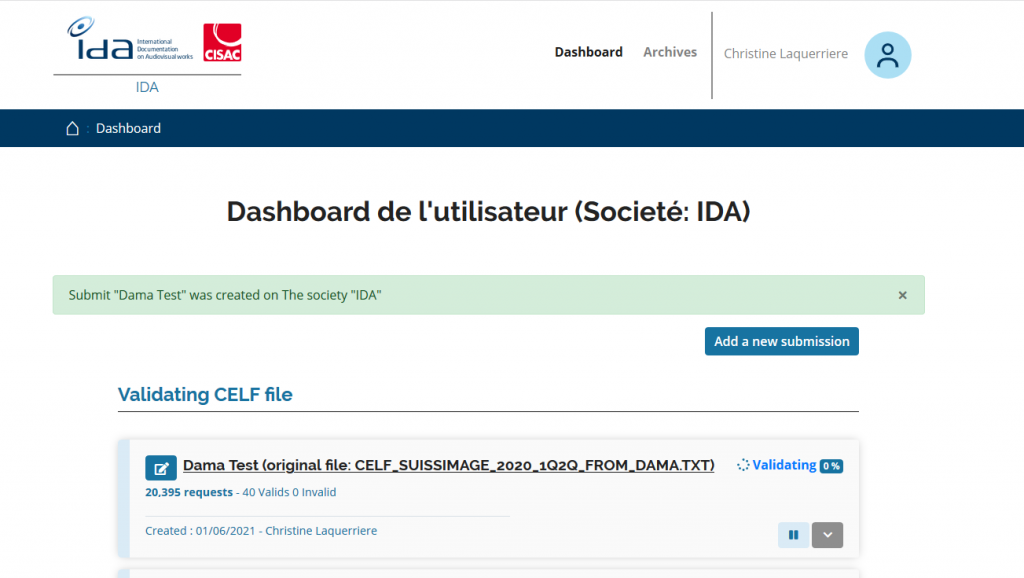
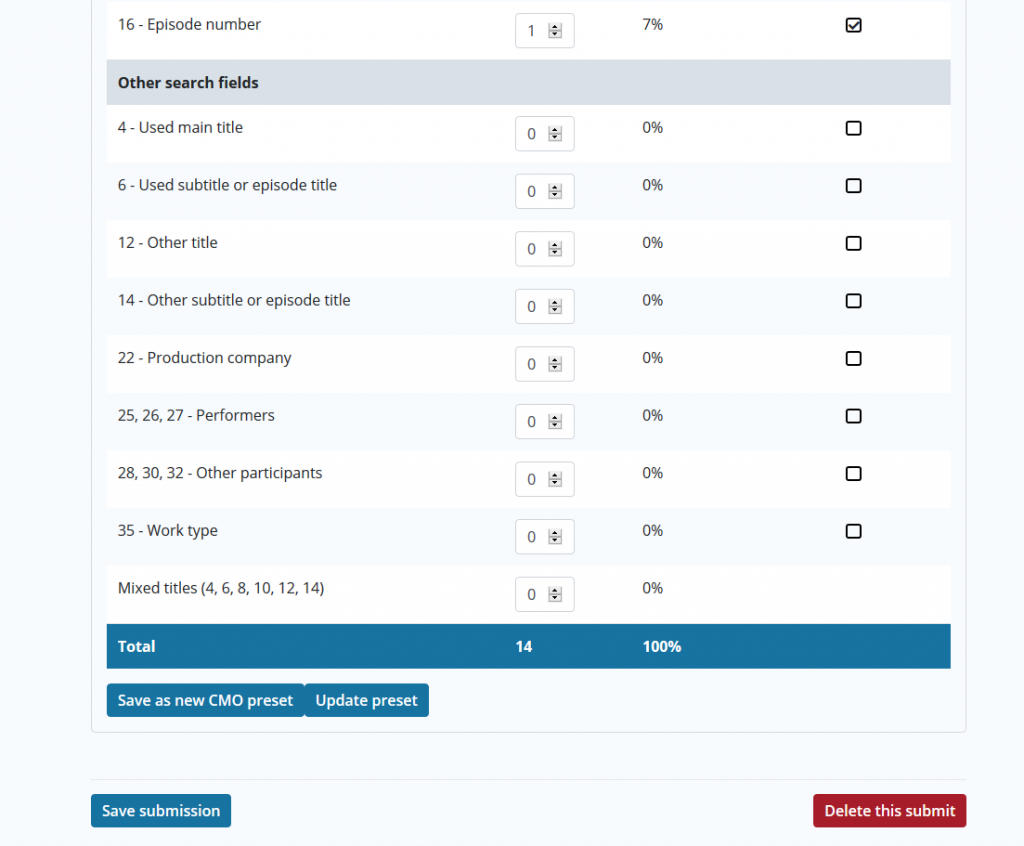
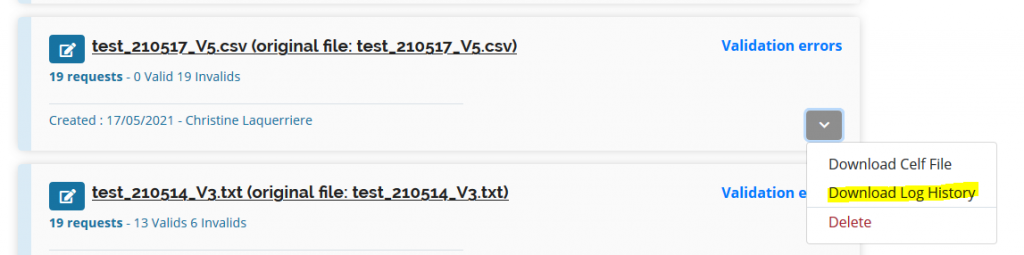
Adjust your preset & / or correct your errors

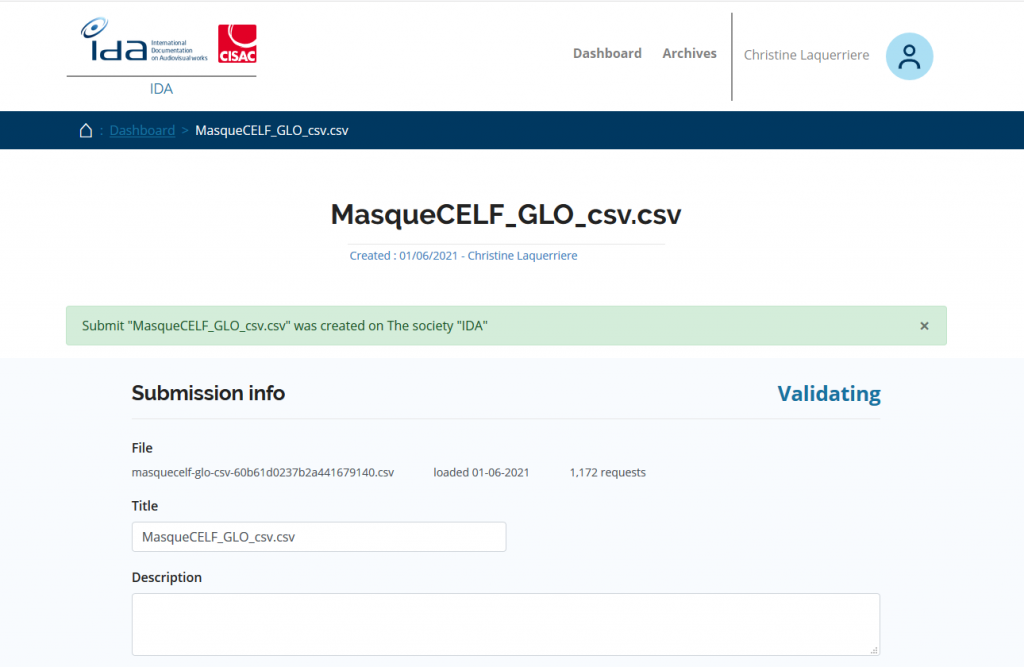
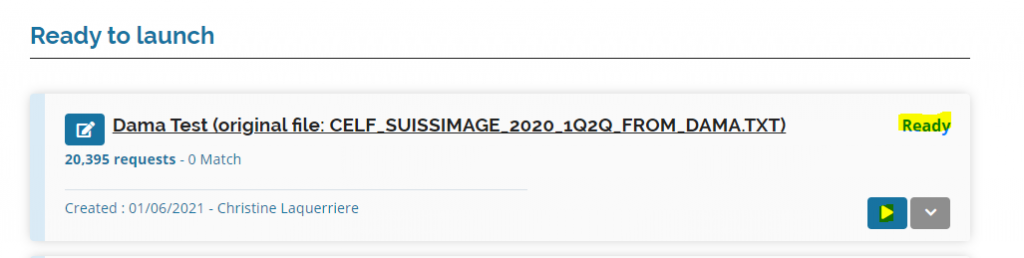
Check the results, formulated as records

Matching Tool's Synthesis

Matching Tool's Definitions and vocabulary​

Enquiry list

File containing information about AV works usage, used by societies to exchange information between them.

CELF

Common Enquiry List Format : CISAC Standard format for Enquiry Lists. The CISAC format CELF is meant to standardize the exchanges of information between sister societies.

Preset

A preset is the user settings for a submission. One default preset exists, but the user can edit its own preset in order to optimize its queries by tuning it to its own need.

Submission

Submission: A submission is created when a user uploads a CELF file. It is composed of the CELF, a preset,
metadata (title, description, time, username) and a status depending on its progress. See the figure 1
“submission lifecycle” below.

Record

One line of the submitted CELF file. The tool will perform one request per record, and output the results.

Results

There are two “results” to distinguish: the possible results given for one request (described here above), and the general results of the whole submission generated as a csv or txt file, exportable by the user.

Validation panel

When the system found several possible results matching one sole record, the user has to manually treat them using the validation panel.